You are here: Assessments/Surveys > Managing Surveys > Adding New Surveys

Adding New Surveys

You can add new Surveys. Surveys can be Global or LearnCenter-specific. By default, all Surveys previously added remain Global until you specify you want them to be LearnCenter-specific.

The Test Delivery server task must be enabled in order for you to use delayed surveys. If the task is not enabled, delayed surveys will not be delivered or displayed in the appropriate dynamic objects.

Contact Customer Support through My Oracle Support to request that this task be enabled.

On the ControlPanel:

  1. Click   on the Assessments/Surveys menu to expand it.
  2. Click Surveys.
  3. Click Add Survey.

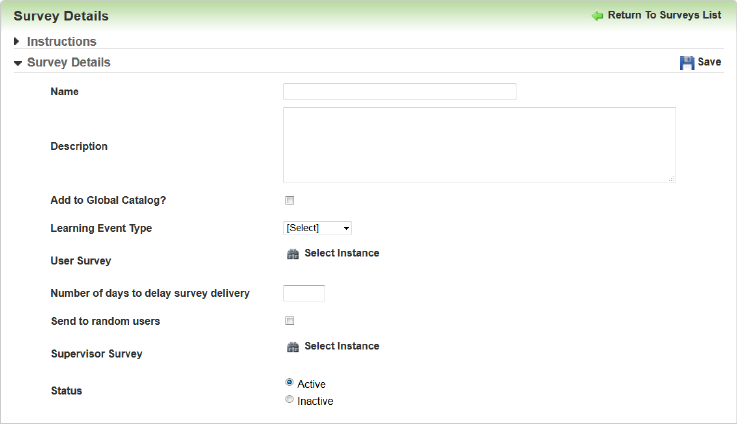
  1. Type the Survey item Name.
  2. Type a Description for the Survey.
  3. Click the Insert Into Global Catalog check box to make Surveys Global.
    or
    Clear the check box to make Surveys LearnCenter-specific. (Default)
  4. Select one of the following from the Learning Event Types drop-down list:
  1. Depending on your choice in the previous step, click Select Course, Select Class, or Select ILT Session. The corresponding selector page displays.
  2. Use the filters to display the event for which you are creating the Survey.
  3. Click the option button beside the event you want, then click Return Selected. The name of the selected event displays in the Select Learning Event section on the Surveys page.
  4. Click Select Instance in the Select User Survey section.
  5. Use the text box to filter to display the Instance.
  6. Click the option button beside the selected Instance, then click Return Selected. The name of the selected Instance displays in the Select User Survey section on the Surveys page.
  7. Type the Number of days to delay survey delivery following the associated learning event.
  8. Click the Send to random users check box to send this Survey to random participants in the learning event.
    or
    Clear the check box to send this Survey to everyone who participated in the learning event. (Default)
  9. Click Select Instance in the Supervisor Survey. The Instance Selector page displays.
  10. Use the text box to filter to display the Instance.
  11. Click the option button beside the selected Instance to which the supervisor Survey is attached, then click Return Selected. The name of the selected Instance displays in the Supervisor Survey section on the Surveys page.
  12. Select a Status:
  1. Click Save.

Related Topics IconRelated Topics


Copyright © 2010-2018, Oracle and/or its affiliates. All rights reserved.