You are here: Content > Importing SCORM Content to Your LearnCenter
Importing SCORM Content to Your LearnCenter
Once you have uploaded content to your LearnCenter FTP site, you can then import it to the warehouse in LearnCenter. SCORM content is imported from the Courses menu in the ControlPanel.

|
Once imported, in order for a particular Admin to access a Course, one of the following criteria must be met:
- The Admin must be logged in with the username that originally imported the Course (the Course owner).
OR
- The Admin must be logged in to the LearnCenter where the Course was originally imported, with a username that has co-owner User Permissions.
BEST PRACTICE: Import all Courses under the ADMINISTRATOR username or create a generic content administrator username for that purpose, rather than importing Courses under a specific individual's username. Course ownership issues could result with Courses imported under an individual's username if that username must be deactivated later.
|
All SCORM content includes a file with the name IMSManifest.xml, regardless of the authoring tool that created the SCORM content. The IMSManifest file is one of the content files that are uploaded to your LearnCenter’s FTP site. To import SCORM content into your LearnCenter, you will need to know the path in your FTP site that leads to the IMSManifest.xml file for the content you want to import.
On the ControlPanel:
- Click
 on the Content
menu to expand it.
on the Content
menu to expand it.
- Click
SCORM Class Importer.
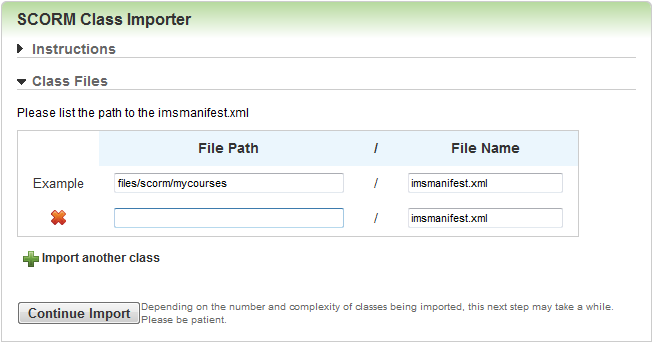
- Type the File Path to the Class you want to import following the example shown on the page. This is the path to your FTP site.

|
You do not need to enter a File Name, because the file name will always be IMSManifest.xml.
|
- Click Import Another Course if you want to import more than one Course at the same time. Each time you click this button another row of File Path fields displays on the page. Complete them as you did in the previous step. You may upload as many as 30 Classes at one time. To remove a Course from the upload list, click
 next to its file path information.
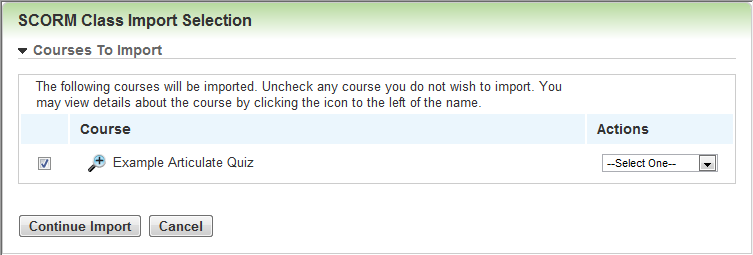
The Courses you selected display in the list.
- Select the check box beside each Class you want to import.
or
Clear the check box of any Class you do not want to import.
- Select one of the following from the Actions drop-down list:
- Import New - imports a brand new Course.
- Overwrite Existing - overwrites an existing Course.
- New Version - creates a new version of an existing Course.
- Click Continue Import. Additional fields display enabling you to customize the Courses you are importing.
|
|
If you click Cancel instead, two new buttons display on the SCORM Class Importer page:
- Start Over - click this to clear your list of files so you can import more files and keep all other settings.
- Import Again - click this to resubmit the same Classes shown after making corrections or changes.
|
This help topic includes all possible fields for this page. What displays for you may differ depending on what is selected on the Course Options page,which is where the default settings for Course options are set.
Debugging SCORM Content
When content is imported, the LearnCenter uses a debugging process to ensure that the LearnCenter and the content can communicate with each other. You should review error and warning messages before continuing with the import process.
- Errors indicate a breakdown in communication and may mean that the content will not function properly.
- Warnings indicate the LearnCenter cannot find some information it is looking for, but that information does not impact the content functioning.
If you receive errors and are familiar with SCORM, expand the menus to view the errors. Most resolutions will require editing the content in the authoring tool and re-publishing.
You can send a screen shot of the errors to Customer Support along with the name of the content and steps you took that produced the error. Contact Customer Support through My Oracle Support.
Availability
When you continue with the import process, additional fields display. Use the Availability section to indicate where the content you are importing will be available.
|
|
Your Taleo Learn Project Manager and Learning Strategist can guide you through selecting the appropriate settings for your organization. |
- Select the Import Class into the Public Catalog check box to make the Course available to all LearnCenters. Selecting this check box makes content available to all sub LearnCenters and all Administrators. Content is in the “Warehouse” waiting to be inserted to the “Showroom” in any sub LearnCenter. Admins with the ability to create an Enrollment will have access to it.
or
Clear the check box to make this Class available to only the current LearnCenter. Only you have access to the file and only if you are within the LearnCenter to which it was imported. As the Administrator who imported the content, you can access it anywhere, regardless of whether it is in the Public Catalog.
|
|
If you are only importing one Course at this time, you can append or overwrite
existing Courses of the same name.
Currently, you can only add a Course to the public catalog at the time of import. If
you re-import the Course to another LearnCenter, you will see two instances of
the Course, no matter which LearnCenter you are in, if you are the person who
imported both instances of the Course. |
- Select the Import children of Class into the Public Catalog check box to make the Course and all its children available to all LearnCenters. Selecting this check box makes the SCOs available to all LearnCenters and all Administrators. Content is in the “Warehouse” waiting to be inserted to the “Showroom” in any sub LearnCenter. Admins with the ability to create an Enrollment will have access to it.
or
Clear the check box to make this Class and its children available to only the current LearnCenter. Only you have access to the file and only if you are within the LearnCenter to which it was imported. As the Administrator who imported the content, you can access it anywhere, regardless of whether it is in the Public Catalog.
- Select the Insert into Class List check box to add the course to the Class list. Selecting this check box makes the content immediately available to Users (inserts content to “Showroom” immediately). It will appear on the LearnCenter Course List.
or
Clear the check box to not include this course on the Class List.
Design the Class
Use this section to make design choices for the content you are importing. You can use most of the fields in this section to override default settings from the Course Options page.

|
Taleo Learn strongly recommends relying on the guidance of your Project Manager, Learning Strategist, or Support Representative for the appropriate settings. |
- Click the Allow Reviews check box if you want to enable users to submit reviews for the Class.
or
Clear the check box if you do not want to enable users to submit reviews for the Class.
|
|
The Allow Reviews check box only displays if the Ratings and Reviews feature is active for this LearnCenter. See Ratings and Reviews for information about this feature. |
- Select the Display TOC prior to Class launch check box to show the table of contents prior to launching the Class.
or
Clear the check box to not show the table of contents prior to launching the Class.
-
Select one of the following from the Display Feedback Form drop-down list. You can use this field to override the setting from the Course Options page.
- Default - uses the value from the parent LearnCenter. If parent LearnCenter is default, Yes is used.
- No - to not display a Feedback Form after completion of a course, regardless of the Class' or course's value for this setting.
- Yes - to display a Feedback Form after completion of every course
- Select one of the following from the Always Show Next Button drop-down list. The Always Show Next Button is used to move through all pages within the course, move to the next course, or exit out of a course. You can use this field to override the setting from the Course Options page.
- Default - uses the value from the parent LearnCenter. If the parent LearnCenter setting is set to Default, No is used.
- No - only shows the Next button if there is a course logically next in a Class or if it is not the last page of the course if launched standalone.
- Yes - to always show the Next button in order to continue with the course or exit the course.
- Select one of the following from the Allow Exit on Next drop-down list. The Allow Exit on Next option works in conjunction with the Always Show Next Button. This option is not applicable if the Always Show Next Button is not enabled, the user is not experiencing a Class session or if there is no course that is next after a Class session. You can use this field to override the setting from the Course Options page.
- Default - uses the value from the parent LearnCenter. If the parent LearnCenter settling is default, Yes is used.
- No - enforces the user to keep experiencing the next course until there is no course logically next or they have reached the end of the course or Class.
- Yes - provides a message to the user to continue to the next course or exit at the last page of the course, only if there is another course after.
- Select one of the following from the Navigation Button Tips drop-down list. You can use this field to override the setting from the Course Options page.
- Default - uses the value from the parent LearnCenter. If the parent LearnCenter setting is Default, On is used.
- Off - to not enable the dynamic help text that displays at the right of the course player's navigation button sections.
- On - to enable the dynamic help text that displays at the right of the course player's navigation button sections.
- Select one of the following from the Center Navigation Buttons Only drop-down list. You can use this field to override the setting from the Course Options page.
- Default - uses the value from the parent LearnCenter. If the parent LearnCenter setting is default, No is used.
- No - to not group the navigation buttons.
- Yes - to group the navigation buttons by course level and Class or administrative buttons.
- Select one of the following from the Show Header drop-down list. You can use this field to override the setting from the Course Options page.
- Select one of the following from the Show Footer drop-down list. You can use this field to override the setting from the Course Options page.
- Inherited - uses the value from the parent LearnCenter. If the parent LearnCenter setting is Default, Yes is used.
- No - to disable the footer. The footer can only be disabled if you are using course player Classic view. See Using the Optional Header and Footer for Courses for additional information.
- Yes - to enable the footer.
- Select one fo the following for LearnCenter Course Player Show Navigation Bar (This setting is only for use with the LearnCenter Course Player.):
- Select one of the following for LearnCenter Course Player Show Navigation Buttons(This setting is only for use with the LearnCenter Course Player.):
- LearnCenter Course Player Width in Pixels (Widget) – is always 100% because it launches from a Widget. This field is display only. (This setting is only for use with the LearnCenter Course Player.)
- For LearnCenter Course Player Height in Pixels (Widget), enter the height of the player as it will launch from the LearnCenter Widget. (This setting is only for use with the LearnCenter Course Player.):
- Select one of the following from the Keep Session Alive drop-down list. You can use this field to override the setting from the Course Options page.
- Inherited - uses the value from the parent LearnCenter. If the parent LearnCentersetting is Default, Yes is used.
- No - to not keep the session alive while a user is experiencing a course.
- Yes - to keep the session alive while a user is experiencing a course.
- Select one of the following from the Look-Ahead Sequencing drop-down list.
- Inherited - uses the value from the parent LearnCenter . If the parent LearnCenter setting is Default, Yes is used.
- No - for all activities to be available in the TOC. Setting Look-Ahead Sequencing to No speeds up navigation from one SCO to another for only SCORM 2004. In addition, setting this field to No allows the user to click on any activity in the TOC and the rules are evaluated at runtime. See Look-Ahead Sequencing for additional information.
- Yes - for all activities to not be available in the TOC.
- Select one of the following from the Auto-Commit Completion/Bookmarking Elements drop-down list.
- Inherited - uses the value from the parent LearnCenter. If parent the LearnCenter setting is default, Yes is used.
- No - to not force a commit as soon as it encounters completion and bookmarking related information passed from the content.
- Yes - to force a commit as soon as it encounters completion and bookmarking related information passed from the content.
- Select one of the following from the Scoring Behavior drop-down list. You can use this field to override the setting from the Course Options page.
- Inherited - uses the value from the parent LearnCenter. If the parent LearnCenter is Default, Always Update is used.
- Always Update - any score that is recorded is reflected towards the course's tracking record.
- Retain Highest - any scores that are equal to or lower are not reflected in the LearnCenter's course tracking record.
- Retain First - if a score is already present for the current course, it will not be overwritten by any subsequent scores the user may achieve. This ensures the first score is always kept in the course's tracking record. Type the name of the Author. (Optional)
- Select one of the following from the Commit Behavior drop-down list:
- Inherited - uses the value from the parent LearnCenter. If the parent LearnCenter setting is Default, Explicit is used.
- Interval-Based - to use the auto-commit on a specified interval.
- Explicit - to use the explicit commit call.
- Select one of the following from the Show Information Bar drop-down list. You can use this field to override the setting from the Course Options page.
- Inherited - uses the value from the parent LearnCenter. If the parent LearnCenter setting is Default, Yes is used.
- No - to not display the course information bar.
- Yes - to display the course information bar.
- Select one of the following from the Show Navigation Buttons Upon SCO Termination drop-down list. You can use this field to override the setting from the Course Options page.
- Default - uses the value from the parent LearnCenter. If the parent LearnCentersetting is Default, No is used.
- No - displays the course player's navigation buttons regardless of the SCORM API state.
- Yes - hides the course player's navigation buttons while the SCORM API session is active.
- Select one of the following from the Send Emails Upon Termination drop-down list. You can use this field to override the setting from the Course Options page.
- Default - uses the value from the parent LearnCenter. If parent LearnCenter is default, Yes is used.
- Yes - delays the sending of the course completion message until the course terminates the SCORM API session.
- No - sends the supervisor an email as soon as the course sends a completed completion status.
- Select one of the following from the Close External Window drop-down list:
- Inherited - uses the value from the parent LearnCenter. If the parent LearnCenter setting is default, Yes is used.
- No - to not automatically close the pop-up window that the SCORM content (the SCO) is contained in. See Close on SCORM API Session Finish for additional information.
- Yes - automatically closes the pop-up window that the SCORM content (the SCO) is contained in.
- Use the drop-down list to specify how you want to Display this Class:
- Embedded in the page. If this option is chose, additional fields appear:
- Show Left Nav Bar - Select this check box to display a left navigation bar on the Class page and type the Width (in pixels) of the navigation bar.
or
Clear the check box to not display a left navigation bar.
- Show Right Nav Bar - Select this check box to display the right navigation bar on the Class page.
or
Clear the check box to not display the right navigation bar.
- Show Top Nav Buttons - Select this check box to display the navigation buttons at the top of the Class page.
or
Clear the check box to not display navigation buttons at the top of the Class page.
- Show Bottom Nav Buttons - Select this check box to display the navigation buttons at the bottom of the Class page.
or
Clear the check box to not display navigation buttons at the bottom of the Class page.
- Type the Class Width of the page (in pixels). You can only type numeric values and percent sign (%). If the percent sign is used, the value must be between 0 and 100.
- Type the Class Height of the page (in pixels). You can only type numeric values and percent sign (%). If the percent sign is used, the value must be between 0 and 100.
- Click Continue Import. The SCORM Class Import Results page opens, and the Classes you imported are listed in the Class column.
- Rest your pointer on a Class name to display additional options.

|
Click this to preview the Class. |

|
Click this to attempt the Class. |
 Related Topics

Copyright © 2010-2018, Oracle and/or its affiliates. All rights reserved.