You are here: Advanced Learning > Electronic Signatures > Adding Electronic Signatures

Adding Electronic Signatures

LearnCenter provides a default electronic signature that you can use. The electronic signature editor allows you to customize the electronic signature. You can add more electronic signatures using the LearnCenter HTML editor if you are familiar with HTML.

Taleo Learn recommends that you do not make any changes to the default electronic signature. You can make a copy of the default and make any changes to the copy as necessary. See Copying Electronic Signatures for additional information.

If you are adding the electronic signature using HTML and not using the default electronic signature provided by the LearnCenter, you must add your electronic signature inside a table for it to display correctly. Use the default electronic signature provided by the LearnCenter if you are not familiar with HTML.

You should not add User fields (username and password.) for electronic signatures for the Self-Registration page, since new Users do not exist when registering and LearnCenter has no data to verify against the database.

On the ControlPanel:

  1. Click on the Advanced Learning menu to expand it.
  2. Click Electronic Signatures.
  3. Click Add Electronic Signature.
  4. Type a Name.
  5. Type a Description.
  6. Select one of the following for Status:
  1. Use the WYSIWYG Editor to add your electronic signature.
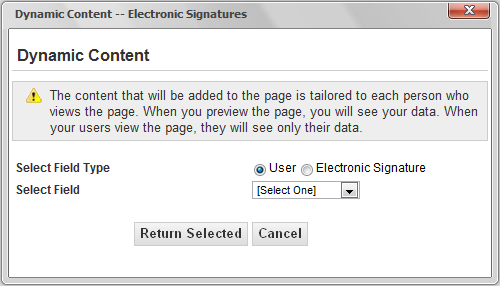
  2. Click to insert a dynamic object.

  1. Click Electronic Signature
  2. Select the first field you want to add to the electronic signature from the Select Field drop-down list. The options in the drop-down list are a combination of the custom fields you added and the ones provided for you based on the default electronic signature.
  3. Click Return Selected
  4. Repeat Steps these steps for each dynamic object you want to add to the electronic signature.
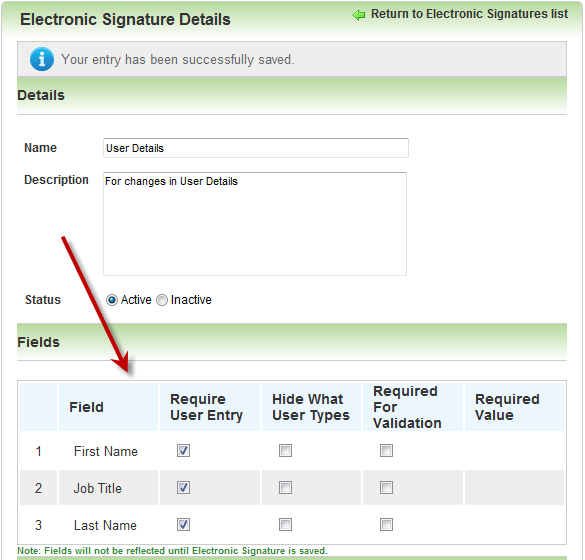
  5. Click Save. The new fields you added display in the Fields section after you click Save.

You can now set the validation requirements for each field.

  1. Click the Require User Entry check box if you require Users to specify a value for the field. If you click this check box, continue with the next steps.
    or
    Clear the check box if you do not require Users specify a value for the field. If you clear this check box, the other check boxes are disabled, because you are not requiring Users to specify a value for the field.
  2. Optional) Click the Hide What User Types check box if you want to hide the value that users typed for the field.
    or
    Clear the check box if you want to display the value that Users typed for the field.
  3. (Optional) Click the Required For Validation check box if you want to add validation to the field.
    or
    Clear the check box if you do not want to add validation to the field.
  4. Type the Required Value you want Users to type for the field. If you selected the Required For Validation check box, you must add a value to this field. Users must type the exact value in this field, or they will receive an error message.
You cannot make a selection for the Password field. All Password fields are disabled. Password information is stored in the LearnCenter database, and Users must type their passwords correctly or they will receive an error message.
  1. Click Save.
  2. Click Return to Electronic Signatures List at the top of the page.

Related Topics IconRelated Topics


Copyright © 2010-2018, Oracle and/or its affiliates. All rights reserved.