
|
|
The information presented in this topic refers to the self service Learn Single Sign-On (SSO) feature. If you have a custom SSO built by the Oracle Taleo Learn Cloud Services team, and you are looking for assistance, please refer to any documentation they have provided. |
You can add new SSO connections as needed. On the Integration Connections page, click Add. A three-tabbed window opens. Complete the information on this page.
|
|
The information you enter here is unique to your organization and must be provided by your IT Department. Please review the topic called SSO Information for Your IT Department before proceeding. |

|
VERY IMPORTANT! If you have a custom SSO set up by our Services team, do not make changes to the Learn SSO pages without first contacting Support. Making changes to these pages while you have an active SSO setup can create problems with access to your LearnCenters. If you currently have a custom SSO that meets your needs, you may keep it for as long as you wish to do so. If you want to migrate from your custom SSO to the Learn product SSO, please open a Service Request (SR) through My Oracle Support to make that request. (Note that if you do NOT have a current custom SSO, no Service Request is necessary in order for you to set up the Learn product SSO.) |
On the ControlPanel:
 on the Integrations menu to expand it.
Integration Type – Set to Learn SSO. You cannot change this setting.
|
|
For example: <saml:Issuer>https://idp.example.org/SAML2</saml:Issuer> . |
SAML Protocol - Set to SAML 2.0. You cannot change this setting.

|
If you would like to learn more about SAML 2.0, visit http://en.wikipedia.org/wiki/SAML_2.0 for a detailed description. |
|
|
For example:
<samlp:NameIdPolicy AllowCreate="false" Format="urn:oasis:names:tc:SAML:1.1:nameid-format:emailAddress"/> </samlp:AuthnRequest>
<saml:NameID Format="urn:oasis:names:tc:SAML:2.0:nameid-format:transient"> 3f7b3dcf-1674-4ecd-92c8-1544f346baf8 </saml:NameID>
NOTE: The value entered in the text box is case sensitive and must be an exact match to your IdP value. |

This tab enables you to designate which sub LearnCenters should be included for your Single Sign-On. For example, you may want to use Single Sign-On from the root LearnCenter and all child sub LearnCenters of the root, or you may want to pick a sub LearnCenter and enable Single Sign On for that sub LearnCenter and all of its child sub LearnCenters.
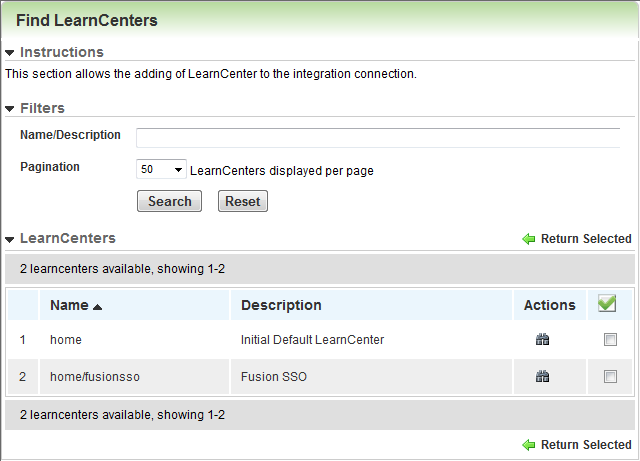
You can also pick and choose individual sub LearnCenters you want to include in the Single Sign-On. This page provides you with the flexibility to set Single Sign-On in the way that works best for your organization. You must choose at least the root or one sub LearnCenter to create a connection.
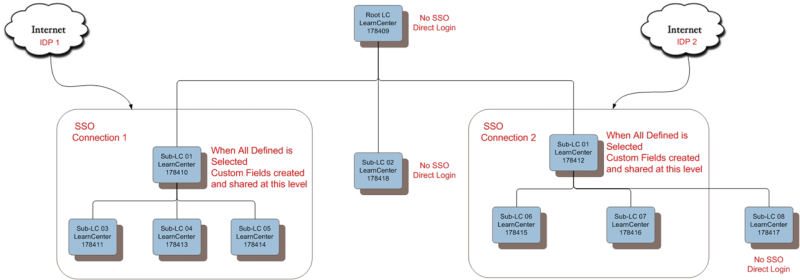
Logic has been built into this feature that prevents you from adding sub LearnCenters that have already being used in another SSO connection or Fusion HCM connection.
The Edit Integration Connection page also enables you to activate "User Management" (on the User Management tab explained below). User Management is a powerful feature that allows for the creation of new User Accounts, insertion of existing User Accounts into other LearnCenters, and the updating of existing Users Accounts in real time through the SSO. On the LearnCenters tab, you have the ability to assign User Accounts to a default User role, or to any other role you have created for that LearnCenter. User Management is useful for both external or internal Users.
|
|
You have the ability to activate or deactivate User Management in individual ssub LearnCenter simply by changing the status. The default status is inactive ( ). However it is not recommended that you activate User Management in LearnCenters that already have a custom User Integration built by our Services team. ). However it is not recommended that you activate User Management in LearnCenters that already have a custom User Integration built by our Services team. |
Click Return Selected.
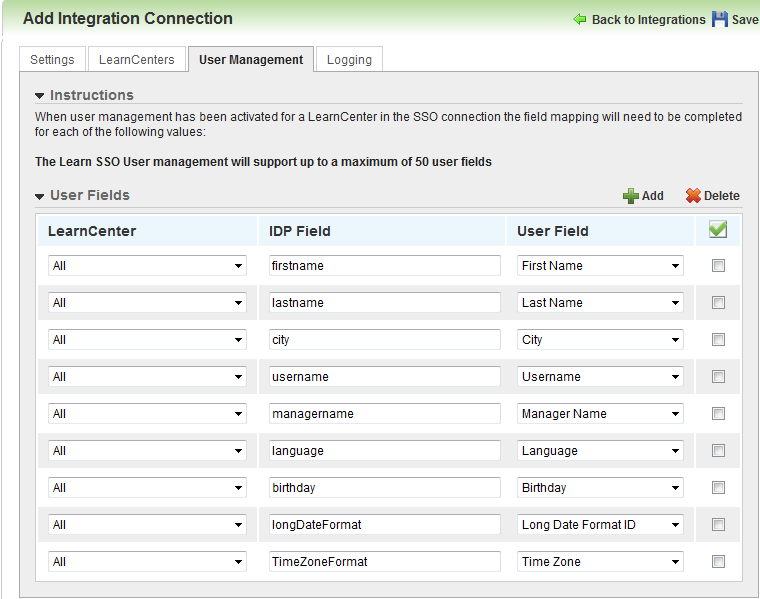
You can also use the User Management tab to map up to 50 User fields. This is done to relate LearnCenter fields to corresponding IdP field for authentication. Choose a LearnCenter from the drop-down list or select All. Type an IdP field and then select a LearnCenter User field. Username is the only required field. All Standard and Custom fields are supported. Some fields require specific values to work properly. See the sections below for specific value settings. There is also a test mechanism to help you determine if you have entered all of your values correctly.
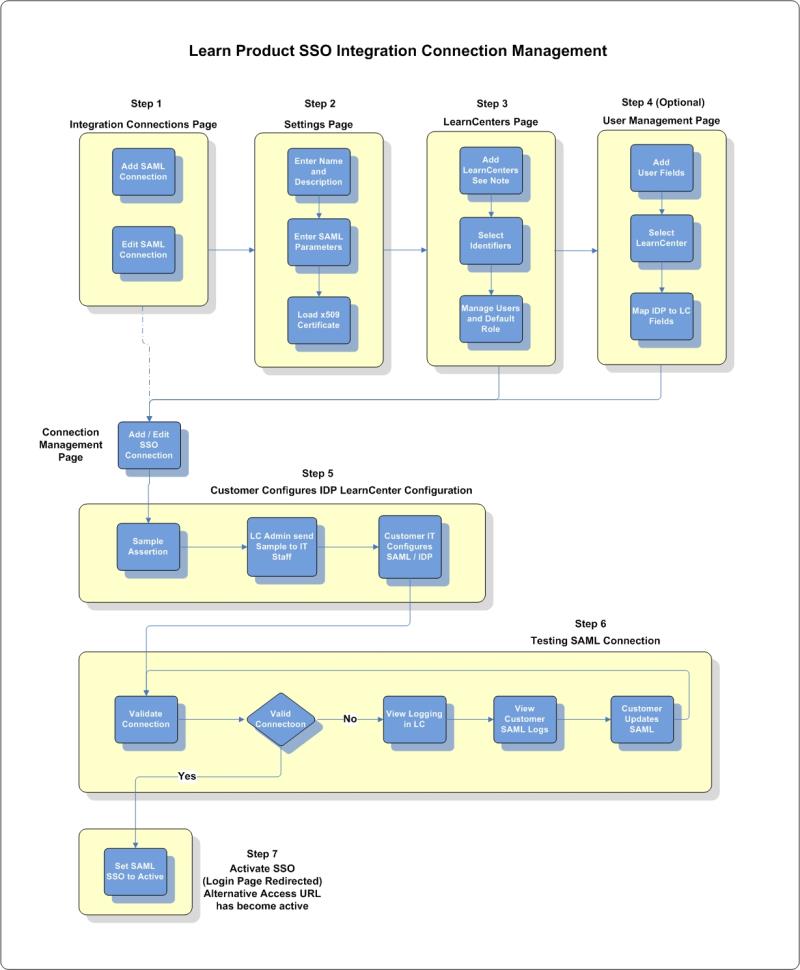
The following work flow diagram provides more detail for the steps required for setting up SSO for your LearnCenter.

Copyright © 2010-2018, Oracle and/or its affiliates. All rights reserved.
 Related Topics