You are here: Options > Configuration Options > Configuring Contacts and Communication Options

Configuring Contacts and Communications Options

Use the fields in the Contacts/Communications panel to specify the default contact information for your LearnCenter. On the ControlPanel:

  1. Click on the Options menu to expand it.
  2. Click Configuration.
  3. Click the Communications tab.

  1. Type or edit the usernames for individuals you want to list for Contacts/Communications information. Contact information displays in the Contacts section of Users’ address books in the Com System. You can type more than one username for each contact. Separate multiple usernames with a comma.

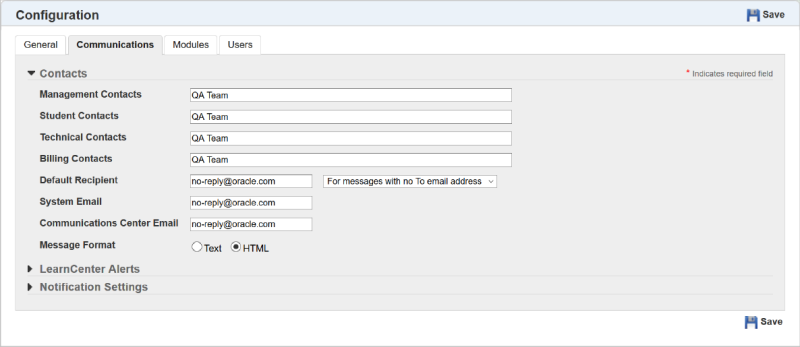
The contact fields are only editable if you have been granted the Edit User Contact Accounts sub permission of Edit LearnCenter Properties. See Options User Permissions for instructions on granting and denying these permissions.

  1. Type the Default Recipient Address.
  2. Select one of the following from the drop-down list:
  1. Type the System Email Address if you want to specify a single email address from which automated system notifications are sent (automated notifications are sent for Enrollments, Assignments, eCommerce, Courses/Classes, Delayed Surveys, and Skills). Specifying a single address can prevent email servers from viewing LearnCenter notifications as SPAM and blocking them from their intended recipients. The email address you specify here will be used for both the Communications Center and external email software. Sub LearnCenter will also receive email notifications from the address you specify in this field for the main LearnCenter.

The System Email Address can be set in the root or at the sub LearnCenter level. When the System Email Address is set in the root LearnCenter, that setting is inherited by sub LearnCenters unless a different address is set in a sub LearnCenter. A sub LearnCenter that does not have a System Email Address set up will inherit the address that is set in the root LearnCenter, but a sub LearnCenter that has a different System Email Address set up will use that different address instead of the address in the root LearnCenter.

If you leave this field blank, all notifications sent through LearnCenter will appear to be sent from the sender's email address for external email and user ID for the Communication Center.

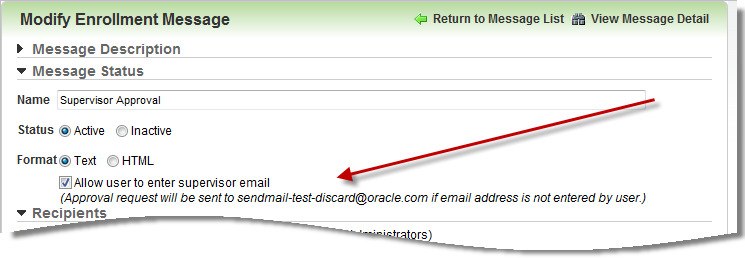
You can set Enrollment messages to come from a different email address by indicating this address for the Enrollments_Notification_Account registry key (located in the External_Communications category). If you do not indicate a separate email address here, all enrollment-related communications will appear to come from the email address you indicated on the Configuration Options page.


The Use_External_Messaging must be set to “1” (true) for LearnCenter to send out enrollment messages.


Contact Customer Support through My Oracle Support to activate either key if they are not already functional for your LearnCenter. Do not change the values of registry keys without first contacting Taleo Learn Support. Taleo Learn will not support issues brought on by unauthorized changes to the registry.


The Test Delivery server task must be enabled in order for you to use delayed surveys. If the task is not enabled, delayed surveys will not be delivered or displayed in the appropriate dynamic objects.

Contact Customer Support through My Oracle Support to request that this task be enabled.

  1. Type the Communications Center Email Address.
  2. Click one of the following to indicate the default Communications Center Message Format:
  1. Scroll down if necessary to view the LearnCenter Alerts section.

  1. (Optional) Clear the Use Default check box and customize the Enrollment Approval Request message. This is the message that displays to Admins or Supervisors on the Edit Enrollments page to indicate that messages will be sent from an alternate address if a User does not provide one.

  1. Type the Signup Pending Approval Message the way you want it to appear to Users. This message displays to self-registering Users if your site is set up to require that new Users are approved by an Admin.
    Or
    Use the default message provided by Taleo Learn.

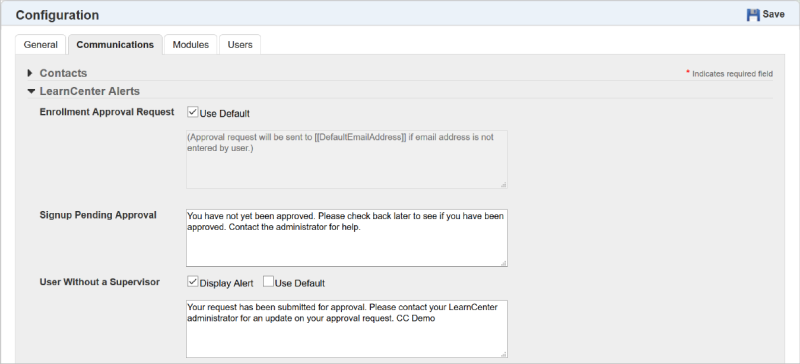
See Self-Registration for additional information on self-registration.

  1. (Optional) Indicate your preference for the User Without a Supervisor alert. This alert displays to Users who have no Supervisors when they self-map or self-register for training that requires supervisor approval. No Communication Messages are sent, but the designated Administrator can view and approve the pending or nominated requests. You can use the default LearnCenter text, or clear the Use Default check box and write your own message.
  2. Scroll down if necessary to view the Notification Settings section.

Use this section to customize the default settings indicating which Users receive custom notifications for Skills and Assignments.

  1. Click the Approved check box to indicate you want notifications sent to Users who have a status of Approved. (Default)
    or
    Clear the check box to indicate you do not want notifications sent to Users who have a status of Approved.
  2. Click the Denied Access check box to you want notifications sent to Users who have a status of Denied Access. (Default)
    or
    Clear the check box to indicate you do not want notifications sent to Users who have a status of Denied Access.

Denied Access messages are sent for previously active Users who were removed or denied access to LearnCenter, but who still have training records that LearnCenter acknowledges and acts upon (for example, assignments due, skills about to expire, etc.). If you prefer not to send messages to these Users, clear the check box.

  1. Click the Pending Approval check box to indicate you want notifications sent to Users who have a status of Pending Approval. (Default)
    or
    Clear the check box to indicate you do not want notifications sent to Users who have a status of Pending Approval.
  2. Click the Removed check box to indicate you want notifications sent to Users who have a status of Removed. (Default)
    or
    Clear the check box to indicate you do not want notifications sent to Users who have a status of Removed.
  3. Click the Send Copy of Notification to User's Supervisor check box to indicate you want a copy of notifications sent to a User's supervisor. (Default)
    or
    Clear the check box to indicate you do not want a copy of notifications sent to a User's supervisor.

Use this check box to send notifications only to supervisors. If the Approved, Denied Access, Pending Approval, and Removed check boxes are cleared, but you click the Send Copy of Notification to User's Supervisor check box, only supervisors will receive copies of notifications and they will be for all User statuses.

  1. Click Save.

Related Topics IconRelated Topics


Copyright © 2010-2018, Oracle and/or its affiliates. All rights reserved.