 on the Options
menu to expand it.
on the Options
menu to expand it.You have the ability to set what LearnCenter standard and custom fields display to Admins, Supervisors, and end Users, and who has the ability to edit these fields. What you select here affects these fields for all pages on which they display throughout LearnCenter for the selected Item Type.
For example, you may want end Users to enter their First Name, Last Name, Email Address, and preferred Time Zone on the pages where these particular standard fields display. That means the fields must first be viewable to Users, and also editable so that they can enter the appropriate data. To do this, select the User View and User Edit check boxes for First Name, Last Name, Email Address, and Time Zone.
If you only want to give Admins access to certain custom fields, you select the Management View and Management Edit check boxes for these fields. Likewise, you can give Supervisors view-only, or view and edit permissions for certain fields using the Supervisor View and Supervisor Edit check boxes. Perhaps you only want Supervisors to view custom Roster fields on My Team, but not edit them. You would select the Supervisor View check boxes for the fields so that they can view the fields, but clear the Supervisor Edit check boxes so that they cannot edit them.
You can set certain fields to be required no matter who has the ability to edit them. If fields are required, Users see a red asterisk (*) next to them. You can also indicate what fields display on the Registration page, Signup page, and User Cards. The changes you make here will take effect for all Users the first time they sign up or the next time they log on based on the way your LearnCenter was set up.
When you first view this page, standard and custom User fields are listed. However, you can select another Item Type from the drop-down list to display other types of fields, such as standard and custom Enrollment, Job Profile, or Roster fields, among others.
On the ControlPanel:
on the Options
menu to expand it.
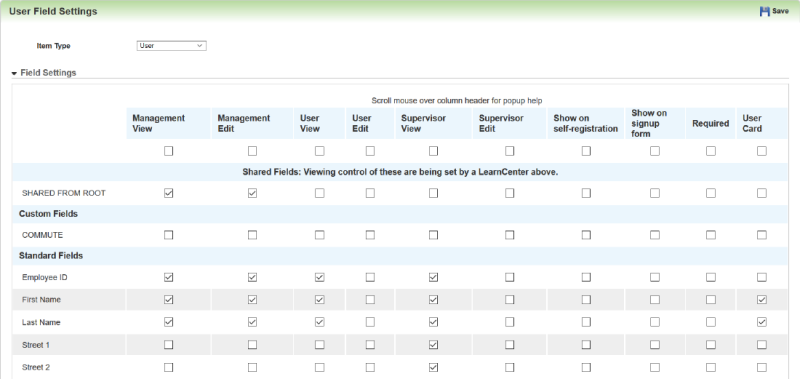
This page lists all custom fields you or other Admins added for LearnCenter, and Standard Fields that are included with LearnCenter. By default, User custom and standards fields display on the page when it first opens. You can view other standard and custom field types by selecting the appropriate Item Type from the drop-down list.
To select all fields in a column, click the gray check box at the top of the column, or clear the gray check box to clear all check boxes in that column. You can also select items individually.
For each field listed on the left side of the page:
|
|
Fields you select in the Management View column will be displayed for administrators only. These fields display in the Users Properties window accessed from the Manage Users page. It also displays on the Gradebook page when you click a student's name. See Users Accounts and the help topic called Gradebook for more information on these pages |

|
If you or another Admin clears the Management View check box on the User Field Settings page for any fields that are used to create a Group criteria, the criteria will be disconnected. Selecting the check box reconnects the criteria. |
|
|
Fields you select in this column will be viewable and editable for administrators only. These fields display in the Users Properties window accessed from the Manage Users page. If you make a field editable for Admins you must also make it viewable. See Users Accounts for more information on the Manage Users page. |
|
|
Fields you select in this column will be displayed on the ControlPanel for Users to view only. |
|
|
Fields you select in this column will be displayed on the ControlPanel for Users to view only. If you make a field editable to Users you must also make it viewable. |
The following fields may or may not display depending on the Item Type you selected.
|
|
Fields selected in this column will display in a form to the Users:
"If OK is selected the next time a User logs into LearnCenter they will be prompted by a form to enter this information. Else if Cancel is selected only new Users on their first time into the LearnCenter will be prompted for this information." Note: If you selected a field to show up on the signup form, you must also select that the User can edit and view the field. Otherwise, the User will not have the capability to fill in the information you requested. |
|
|
Fields selected in this column become mandatory fields. Users or administrators who log in or edit data must complete all required fields before they can save their changes. |
If the post-status is changed to an incomplete post-status, the custom Roster field data can be edited by Users who have ‘Management Edit’, ‘User Edit’, or ‘Supervisor Edit’ permissions for custom Roster fields.
or
Clear the check box to allow Users who have been granted the Management Edit, User Edit, or Supervisor Edit permissions for custom Roster fields to edit the custom Roster fields for an enrolled User whose Enrollment pre-status is Approved or Forced Enrollment, and the Enrollment post-status is set to one of the statuses listed above.

|
Additionally for custom Roster fields:
|

Copyright © 2010-2015, Oracle and/or its affiliates. All rights reserved.
 Related Topics