You are here: User Accounts > Methods for Inserting New Users > Bulk Importing Users

Bulk Importing Users

Use the Bulk Import Users option to import user information from text files or spreadsheets. You can import a few or many Users at once (however recommended maximum is 20,000 Users at a time). Include as much information as you want, but at minimum, you should import at least a username, first name, last name, and password for each user. (Recommended maximum size is 20 columns of data or a file size of 7 - 8 MB.) Username and passwords are required to use this feature.

If you do not know what characters are allowed for your LearnCenter, contact the Admin who is responsible for administering the User Control Settings section of the System Options page in the root LearnCenter. Possible characters could include:

  • Uppercase and lowercase letters (usernames are not case-sensitive).
  • Any special character EXCEPT a space or the characters ,% [ ] \

Examples of allowed special characters: -.! # $ & ' * + - / = ? ^ _ ` { | } ~

PLEASE NOTE:

  • The dash (-) character, if allowed, must be placed at the very beginning or at the very end of the allowable special characters in the User Control Settings. In the username format itself, the dash (-) can be placed anywhere (Example: JOHN-SMITH).
  • The decimal (.) character, if allowed, CANNOT be placed at the very beginning or at the very end of the allowable special characters in the User Control Settings. In the username format itself, the decimal (.) can be placed anywhere (Example: JANE.SMITH).


The fields First Name, Last Name and Group can contain up to 100 characters each.


Taleo Learn advises against the practice of simultaneously allowing multiple Users to use the default Administrator account to do bulk imports. Doing so will cause conflicting imports. Instead, use individual named accounts for this feature.

On the ControlPanel:

  1. Click  on the Users menu to expand it.
  2. Click Bulk Import Users.
  3. Select a file type from the Import type drop-down list:
Microsoft Access adds the column headers with the data. You can exclude the heading row when importing.
  1. Retrieve the data based on the Import Type you selected. See the following sections for instructions.

Pasting Into Text Area

If you selected Paste into text area, additional fields become available.

  1. Copy the text from your source file and paste it into the Paste Data Into Text area field.
  2. Select a Column Delimiter. This tells LearnCenter how the information you pasted is to be separated into columns. Select one of the following:
  1. Select a String Qualifier:
  1. Click Continue with Import.

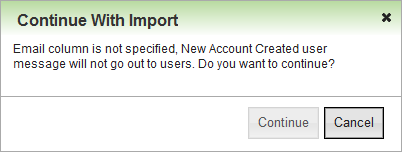
If you do not specify an email address in the source file when bulk importing Users, User Communication Messages cannot be sent to them. The following message displays to alert you of this so that you can go back and add an email address for new Users.

Click Continue to continue without adding email addresses, or click Cancel to go back and add email addresses.

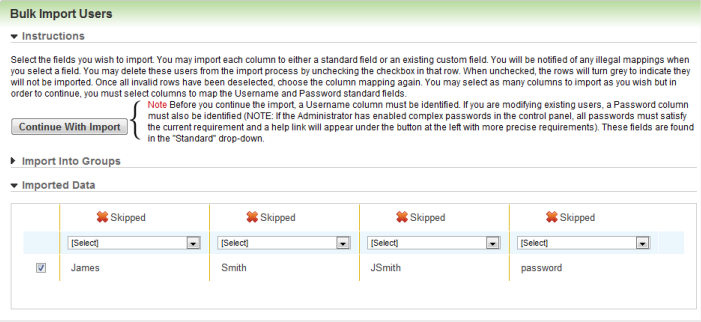
  1. For each column of data imported, use the drop-down list to identify the type of data it is. Important: You must map one column to Username and one to Password for the Users to be imported.

Example: You want the data in the first column to be mapped to First Name. Select First Name from the drop-down list. You want the data in the second column to be mapped to Last Name. Select Last Name from that column’s drop-down list.

If you are trying to map a field and the following error message appears: “This is not a valid field. Would you like to view the invalid rows?”, click Yes to highlight the fields that have invalid data in red.

Possible causes of errors:

  • Data not matching the characteristics of the field you are mapping.
  • Check if there is a minimum or maximum set up for that field.
  • Check if there is a character limitation for that field.
  • Check if there is a specific data format expected.

Taleo Learn recommends that you document the row that is causing the error, and skip those rows. Once you fix them in Excel (or the program you got your data from), you can then try to re-import the rows that caused you problems.

  1. If there are columns of data that you do not want to import, do not assign them column names. An icon, X Skipped , appears at the top of those columns. If a column name was already assigned to an unwanted column, click the X Skip Column button at the top of that column. Information in skipped columns will not be imported.
  2. Select the check boxes next to the records you want to import. By default, all check boxes are selected. If there are any rows of data you do not want to import, clear the check box for those rows and their data will not be imported.
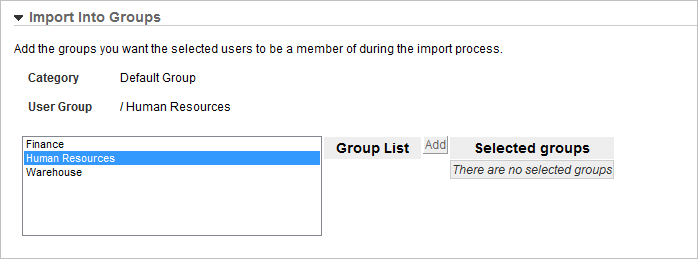
  3. If your LearnCenter uses the classic groups functionality, you can add the Users to groups.Click next to Import Into Groups in the middle section of the page to display the list of user groups.
If your LearnCenter uses the new Groups functionality, the Import Into Groups field is not available.

  1. Select a group, and then click Add to move it to the Selected Groups list. Repeat this process for each group you want to add the Users to.
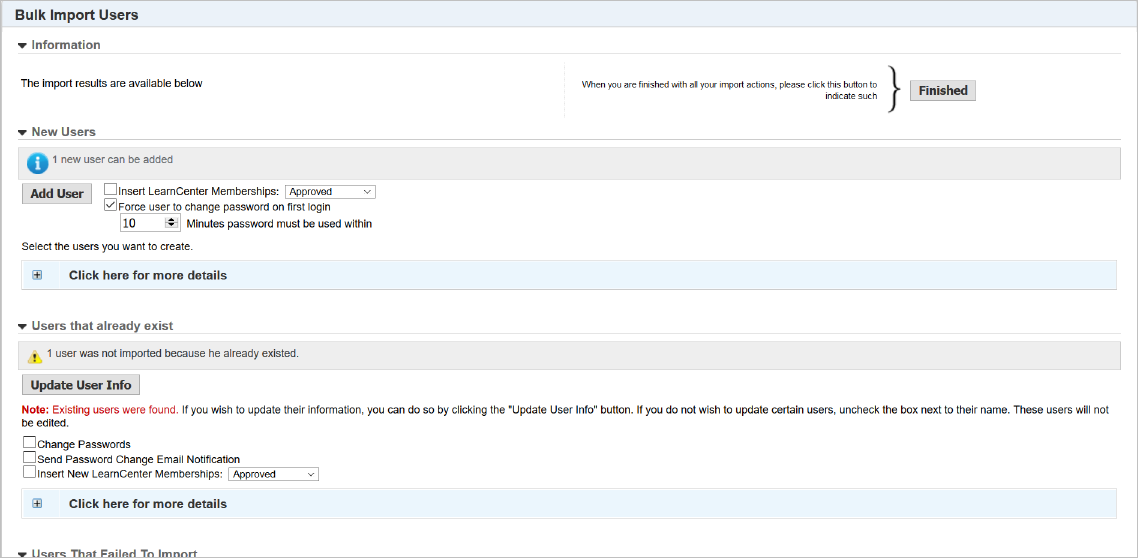
  2. Click Continue with Import. The import results are displayed.

The Users who will be imported are visible in the New Users section. Click next to Click here for more details to display the list of Users. If any of the Users already exist, they will be visible under Users That Already Exist. If any Users failed to import for any reason, they will be visible under Users that Failed to Import.

  1. Click the Insert LearnCenter Memberships check box.
This step is very important. If you do not click this check box, the Users will be created, but their membership will not be inserted and you will not be able to see the User accounts in LearnCenter. You will receive an error message stating that the username already exists if you try to create it again. The only way to correct that situation is to bulk-import the Users again and click the Insert LearnCenter Memberships check box to insert their membership.
  1. Select a status from the drop-down list:
See Membership Statuses for detailed information about each of these statuses.
  1. Select the Force User to change password on first login check box to indicate that you want the Users you are adding to change their passwords the first time they log in to LearnCenter. This field displays when you have included email addresses for Users on the Bulk Import page. If you did not specify an email address a new error message displays, alerting you to this fact. If there is no email address associated with these Users, then the automatic User Communication Messages cannot be sent.
    or
    Clear the check box to indicate that you do not want to force Users to change their passwords the first time they log in.
  1. Click Add Users.

If  there are Users that already exist, do the following:

  1. Select the Change Passwords check box to indicate that you want to change the passwords for these Users. Selecting this check box means the password will be changed for all existing Users you are inserting.
    or
    Clear the check box if you do not want to change the password for the existing Users you are inserting. (Default)
  2. Select the Send Password Change Email Notification check box if you want to have LearnCenter automatically send a User Communication Message alerting the existing Users you are inserting that their password has been changed.
    or
    Clear the check box if you do not want to use the automatic User Communication Message.
  3. Select the Insert New LearnCenter Membership check box to indicate that you want the Users to have a different LearnCenter membership than they do in another LearnCenter. For example, they may be Approved in their original LearnCenter but you want them to be Pending in the current one.
  1. Select a status from the drop-down list:
  1. Click Finished.

Uploading As Text Files

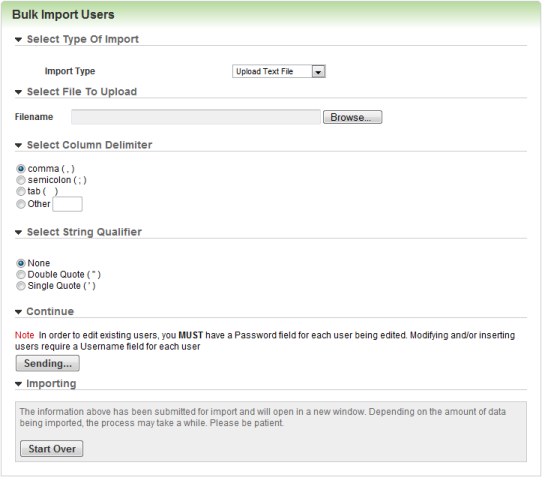
If you selected Upload Text File as your Import Type, additional fields display.

  1. Click Browse, locate the file to import, then click Open.
The file must be a .TXT file. You can save a Microsoft Excel file as a .TXT.
  1. Select a Column Delimiter. This tells LearnCenter how the file is to be separated into columns. Select one of the following:
These are generally used when you are selecting to export data from a database using specific delimiters and string Qualifiers. Otherwise you can just let this default.
  1. Select a String Qualifier:
  1. Click Continue with Import.

If you do not specify an email address in the source file when bulk importing Users, User Communication Messages cannot be sent to them. The following message displays to alert you of this so that you can go back and add an email address for new Users.

Click Continue to continue without adding email addresses, or click Cancel to go back and add email addresses.

  1. For each column of data imported, use the drop-down list to identify the type of data it is. You must map one column to Username and one to Password for the Users to be imported.

Example: You want the data in the first column to be mapped to First Name. Select First Name from the drop-down list. You want the data in the second column to be mapped to Last Name. Select Last Name from that column’s drop-down list.

If you are trying to map a field and the following error message appears: “This is not a valid field. Would you like to view the invalid rows?”, click Yes to highlight the fields that have invalid data in red.

Possible causes of errors:

  • Data not matching the characteristics of the field you are mapping.
  • Check if there is a minimum or maximum set up for that field.
  • Check if there is a character limitation for that field.
  • Check if there is a specific data format expected.

Taleo Learn recommends that you document the row that is causing the error, and skip those rows. Once you fix them in Excel (or the program you got your data from), you can then try to re-import the rows that caused you problems.

You can import Short Date Format, Long Date Format, Time Format, Start of Week, Language, Time Zone, Daylight Saving, Time Zone Display. The Bulk Importer only accepts specific values for each of the corresponding fields. For example, to specify a Short Date format of "m/d/yyyy", you must enter "1" in the field.

CollapsedClick here to display the accepted values for each of the fields:


  1. If there are columns of data that you do not want to import, do not assign them column names. An icon, X Skipped , appears at the top of those columns. If a column name was already assigned to an unwanted column, click the X Skip Column button at the top of that column. Information in skipped columns will not be imported.
  2. Select the check boxes next to the records you want to import. By default, all check boxes are selected. If there are any rows of data you do not want to import, clear the check box for those rows and their data will not be imported.
  1. If you want to add the Users to groups, click next to Import Into Groups in the middle section of the page to display the list of user groups.

  1. (Optional) Select a group, and then click Add to move it to the Selected Groups list. Repeat this process for each group you want to add the Users to.
  1. Click Continue with Import. The import results are displayed.

The Users who will be imported are visible in the New Users section. Click next to Click here for more details to display the list of Users. If any of the Users already exist, they will be visible under Users That Already Exist. If any Users failed to import for any reason, they will be visible under Users that Failed to Import.

  1. Click the Insert LearnCenter Memberships check box.
This step is very important. If you do not click this check box, the Users will be created, but their membership will not be inserted and you will not be able to see the User accounts in LearnCenter. You will receive an error message stating that the username already exists if you try to create it again. The only way to correct that situation is to bulk-import the Users again and click the Insert LearnCenter Memberships check box to insert their membership.
  1. Select a status from the drop-down list:
See Membership Statuses for detailed information about each of these statuses.
  1. Select the Force User to change password on first login check box to indicate that you want the Users you are adding to change their passwords the first time they log in to LearnCenter. This field displays when you have included email addresses for Users on the Bulk Import page. If you did not specify an email address a new error message displays, alerting you to this fact. If there is no email address associated with these Users, then the automatic User Communication Messages cannot be sent.

    or

    Clear the check box to indicate that you do not want to force Users to change their passwords the first time they log in.
  1. Click Add Users.

If  there are Users that already exist, do the following:

  1. Select the Change Passwords check box to indicate that you want to change the passwords for these Users. Selecting this check box means the password will be changed for all existing Users you are inserting.

    or

    Clear the check box if you do not want to change the password for the existing Users you are inserting. (Default)
  2. Select the Send Password Change Email Notification check box if you want to have LearnCenter automatically send a User Communication Message alerting the existing Users you are inserting that their password has been changed.

    or

    Clear the check box if you do not want to use the automatic User Communication Message.
  3. Select the Insert New LearnCenter Membership check box to indicate that you want the Users to have a different LearnCenter membership than they do in another LearnCenter. For example, they may be Approved in their original LearnCenter but you want them to be Pending in the current one.
  1. Select a status from the drop-down list:
  1. Click Finished.

Related Topics IconRelated Topics


Copyright © 2010-2015, Oracle and/or its affiliates. All rights reserved.