You are here: User Accounts > Managing Users > Managing User Profiles

Managing User Profiles

A basic User account consists of Username, Email address, and password information only, but you can add a more robust User profile. A User profile can include information like first name, last name, and job title, or any other information your organization needs to collect about your Users. You can add this profile when you first insert the User into the LearnCenter or return at any time to add or edit the profile.

You can customize which Standard and Custom fields display on the User Information page. See Field Settings and Custom Field Settings for additional information.

If you have just added a new basic User account, scroll down to view the Actions for Recently Added User section, and then click next to the Username.

Or

On the ControlPanel:

  1. Click  on the Users menu to expand it.
  2. Click Users.
  3. Search for the User whose profile you want to edit or add. 
  4. Click next to the Username.The User Properties window opens.
  5. Click to expand the Instructions section.

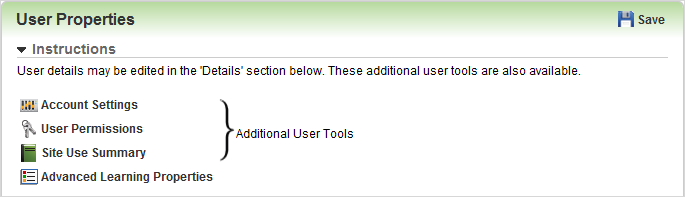
You can use this section to perform several User-related tasks:

  1. Scroll down to view the Details section.

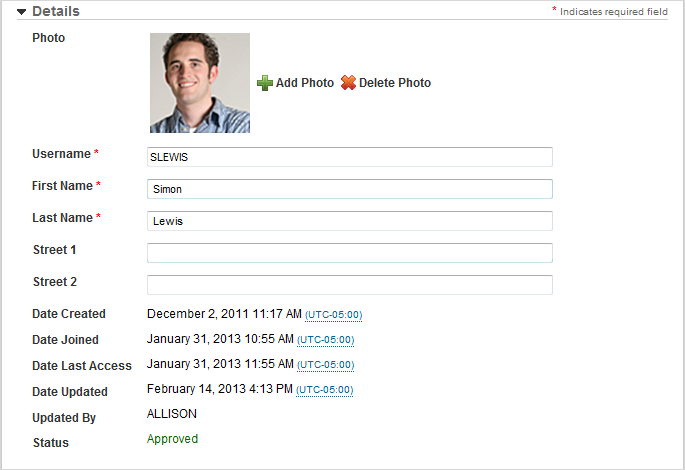
The fields that display in this section depend on the standard and custom fields settings you or your System Admin selected to display. The following steps describe all possible standard fields available for this section. What you see on your own window depends on your specific setup.

  1. (Optional) Type a new Username.

If you do not know what characters are allowed for your LearnCenter, contact the Admin who is responsible for administering the User Control Settings section of the System Options page in the root LearnCenter. Possible characters could include:

  • Uppercase and lowercase letters (usernames are not case-sensitive).
  • Any special character EXCEPT a space or the characters ,% [ ] \

Examples of allowed special characters: -.! # $ & ' * + - / = ? ^ _ ` { | } ~

PLEASE NOTE:

  • The dash (-) character, if allowed, must be placed at the very beginning or at the very end of the allowable special characters in the User Control Settings. In the username format itself, the dash (-) can be placed anywhere (Example: JOHN-SMITH).
  • The decimal (.) character, if allowed, CANNOT be placed at the very beginning or at the very end of the allowable special characters in the User Control Settings. In the username format itself, the decimal (.) can be placed anywhere (Example: JANE.SMITH).
This field is only editable if a registry key is set. Contact Customer Support through My Oracle Support to have this key set for you.
  1. (Optional) Upload a photo of the User. You can upload a User photo that is in .GIF or .JPG format, and up to 1 Megabyte in size.
  2. Type the User's First Name. You can type up to 100 characters.
  3. Type the User's Last Name. You can type up to 100 characters.
  4. Type the User's Street 1.
  5. Type the User's Street 2.
  6. Type the User's City.
  7. Type the User's State/Province.
  8. Type the User's Postal Code.
  9. Type the User's Country.
  10. Type the User's Day Phone.
  11. Type the User's Evening Phone.
  12. Type the User's Pager.
  13. Type the User's Interactive Pager.
  14. Type the User's Mobile Phone.
  15. Type the User's Fax number.
  16. Type the User's Email address.
  17. Type an alternative Email address in the Email 2 field.
  18. Type the User's Social Security Number in the SSN field.
  19. Select the User's Gender from the drop-down list.
  20. Type the User's Nickname.
  21. Type the User's Spouse's Name.
  22. Type the User's Company name.
  23. Type the User's Job Title.
  24. Type the User's Department name.
  25. Type the User's Manager Name.
  26. Type the name of the Office in which the User works.
  27. Type the name of the User's Profession.
  28. Select one of the following for Uses Outlook:
This feature can be enabled or disabled for you by Taleo Learn Support.
  1. Select one of the following for Uses Lotus Notes:
This feature can be enabled or disabled for you by Taleo Learn Support.
  1. Type the User’s information in the remaining fields. These include Standard Fields, Custom Fields, Shared Fields, and System Fields. Any fields marked with a red asterisk (*) are required.

System Information is read-only information about the User:
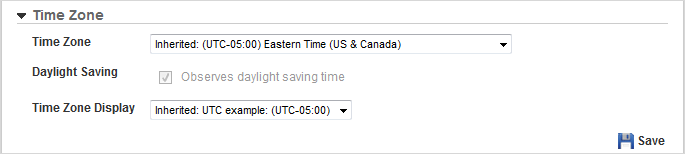
  • Date Created - the date the User's account was created by an Admin.
  • Date Joined- the date this User joined the LearnCenter.
  • Date Last Access - the date this User last accessed the LearnCenter. Note:LearnCenter keeps only the last 12 months of data for User Sessions and Session Detail. If a User has not accessed this LearnCenter in the last 12 months, this field will be blank.
  • Date Updated - the date of the last update to this User’s information.
  • Updated By - the name of the administrator who updated this User’s information.
  • Status - the current status of this User.

  1. Select the User's Long Date Format. The word "Inherited" indicates the setting is inherited from the root LearnCenter setting. An example of the Inherited selection displays for you to view.
  2. Select the User's Short Date Format. The word "Inherited" indicates the setting is inherited from the root LearnCenter setting. An example of the Inherited selection displays for you to view.
  3. Select the User's Time Format; either 12 hour or 24 hour time format. This selection indicates how calendars will display to the User throughout the LearnCenter. The word "Inherited" indicates the setting is inherited from the root LearnCenter setting. An example of the Inherited selection displays for you to view.
  1. Select the User's Start of Week. This selection indicates how calendars will display to the User throughout the LearnCenter. The word "Inherited" indicates the setting is inherited from the root LearnCenter setting.An example of the Inherited selection displays for you to view.
  2. Select the User's preferred Language. The word "Inherited" indicates the setting is inherited from the root LearnCenter setting. An example of the Inherited selection displays for you to view.

  1. Indicate the User's Workweek schedule. If the User works Monday, Tuesday, Wednesday, Thursday, and Friday, select the corresponding check boxes. If Inherited is selected, it indicates the setting is inherited from the root LearnCenter. An example of the Inherited selection displays for you to view. If you need to select something other than the default Inherited selection, clear the Inherited check box and then make your selections.

  1. Select the User's Time Zone. The word "Inherited" indicates the setting is inherited from the root LearnCenter setting. An example of the Inherited selection displays for you to view.

You can select the LearnCenter Time Zone instead of using the server time zone.

All the dates and times that are stored in the LearnCenter using the server's timestamp for the learning event are stored in Eastern Standard Time. These dates and times are converted using the server's built-in time zone conversion. The server's timestamp is of web server or database server, but both servers use the same time zone.

The Time Zone priority for Users is as follows:

  1. User Time Zone
  2. LearnCenter Time Zone
  3. Parent LearnCenter or Parent Root Time Zone
  4. Server Time Zone

The Time Zone priority accessed through the ControlPanel is as follows:

  1. Learning Event Time Zone
  2. LearnCenter Time Zone
  3. Parent LearnCenter or Parent-Root Time Zone
  4. Server Time Zone
  1. Select the Daylight Saving check box if the User lives in an area that observers Daylight Saving time.
    or
    Clear the check box if you the User lives in an area that does not observe Daylight Saving time.
  2. Select one of the following for the User's Time Zone Display:
UTC time zone and abbreviations will change if an Admin or User has selected that the time zone observes Daylight Saving. For example in winter they show: (UTC –05:00) Eastern Time (US & Canada) or EST (Eastern Standard Time) But in May or any of the DST months it would display: (UTC-04:00) Eastern Time (US & Canada) or EDT (Eastern Daylight Time). UTC values remain in the same order when displayed in the drop-down lists, but the times may vary and be out of order during DST. Also, the southern hemisphere observes DST the opposite of when Northern hemisphere observes.
  1. Click Save.

Related Topics IconRelated Topics


Copyright © 2010-2015, Oracle and/or its affiliates. All rights reserved.