
The Content Manager enables you to create training using unstructured training assets, such as Microsoft Word documents, Microsoft PowerPoint files, PDFs, Microsoft Excel spreadsheets, Rich Text Format documents, and text files. For example, you may be using Standard Operating Procedures (SOPs) and policy documents for training purposes. These documents can be uploaded to the Content Manager and quickly converted to the Media Course type, and then viewed and tracked the same way other LearnCenter Courses are. When you upload documents to the Content Manager, there is no need to access the SFTP site, and you do not have to upload the files to the Resource Manager.
You can map Media Courses to training items (such as Learning Plans or Enrollments), or you can place them directly onto LearnCenter Designer pages. When Users access these Courses, they will open using a Document Course Viewer which is only available with the LearnCenter Course Player. This viewer was built using “responsive design” which makes it fit easily onto the screens of PCs, smart phones, or tablets.
With the Content Manager you can also:
|
|
This feature does not use or share resources with the Resource Manager. Documents previously uploaded to the Resource Manager are not available for use with Content Manager. If you are already using documents for training purposes, and they were previously uploaded to the Resource Manager, you will need to re-upload them to the Content Manager if you want to use them with this functionality. |
On the ControlPanel:
 on the Content
menu to expand it.
on the Content
menu to expand it.
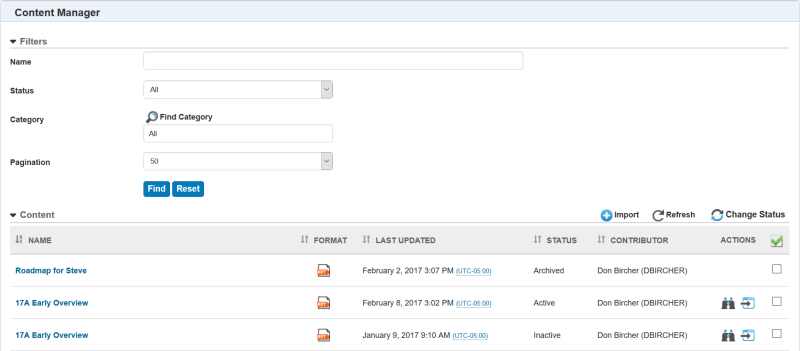
The Content Manager page contains the documents you have uploaded to the Content Manager. Notice that each document has an icon that shows you what type of item it is (PowerPoint, Word, etc.). You can also see the date it was Last Updated and the Contributor who uploaded the document.
There is a Filters section to help you sort and find documents. You can filter by Name, Status, and Category. You can also indicate how many items you want to display per page using the Pagination drop-down list.
The document Status can be any of the following:

|
IMPORTANT: Once items are archived, their physical files are completely deleted from LearnCenter, which frees up space on your server. Only tracking information is retained. You cannot revert to a previous version of a file that has been archived. You cannot bring them back with an Active status, unless you re-upload them from your PC. |
You can change a document’s status by selecting the check box next to it, and then using the Change Status icon and accompanying drop-down list. Notice that Active and Inactive documents have icons in the Actions column.
Even though the Content Manager page resembles other Control Panel pages where there are lists of items, there is some behavior that is specific to this page.
These are the general steps you will follow to import, convert, and use a document.

Copyright © 2010-2018, Oracle and/or its affiliates. All rights reserved.
 Related Topics