
If you need to add more than a handful of Users, try using the Bulk Import feature instead, or speak to your Account Manager for information on integration with an HRIS or other system. You can also insert existing Users from another LearnCenter.
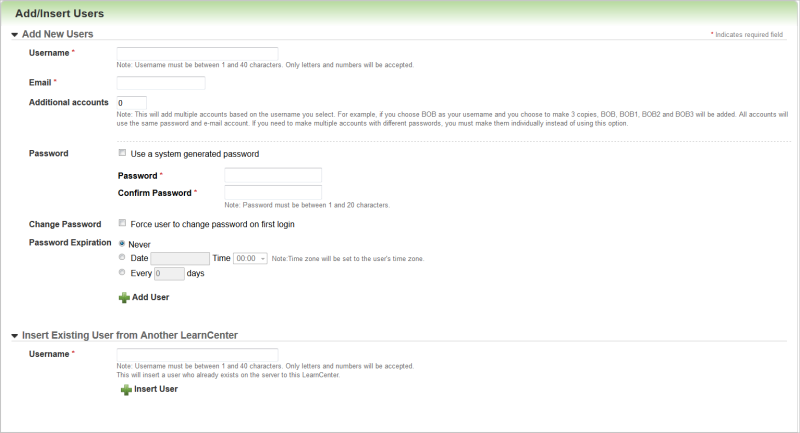
You can add brand new, basic User accounts one-by-one by typing in a few pieces of information. This method of User creation is best when you only have one or two Users to insert into your site. Once you have added the basic account, you can complete more detailed User profile information and assign User Permissions.
|
|
If you need to add more than a handful of Users, try using the Bulk Import feature instead, or speak to your Account Manager for information on integration with an HRIS or other system. You can also insert existing Users from another LearnCenter. |
On the ControlPanel:

|
If you do not know what characters are allowed for your LearnCenter, contact the Admin who is responsible for administering the User Control Settings section of the System Options page in the root LearnCenter. Possible characters could include:
Examples of allowed special characters: -.! # $ & ' * + - / = ? ^ _ ` { | } ~ PLEASE NOTE:
|

|
You can set up the UserNamesAllowedPrompt registry key to control the prompt text in the username field. See Registry Editor for instructions on setting Registry Keys. |
|
|
The total length of Username field and the Additional Accounts field must be within the limit specified in the MaxUsernameLength LearnCenterregistry. For example, if the MaxUsernameLength is 100 and you type 99 characters for a username field, then enter 10 in the Additional Accounts field, the system would try to add a User with 101 characters breaking the maxusernamelength rule. See Registry Editor for instructions on setting Registry Keys. |
|
|
You can set up the PasswordsAllowedPrompt registry key to control the prompt text in the password field. See Registry Editor for instructions on setting Registry Keys. |
If you need to change the Password Expiration setting later, you can do so on the User Account Settings page.
|
|
You can also get the error message if you added the User previously, but did not click the Insert LearnCenter Memberships check box or chose a status in the Bulk Import Users page. If you do not click this check box, you will not see the Users listed on the Users page. To eliminate the error, you need to edit the User from the Actions for Recently Added User section and do the Bulk Import again. You must click the Insert (See Bulk Importing Users for information about this page.) |

You have added a basic User account with username, Email account, and password information only. You can now do the following:

|
Once a User account is created using the steps above, the "New Account Created" Communication Message is triggered and sent to your newly created User. By default, this message comes with suggested text which contains dynamic tags for First Name and Last Name. Since the Add/Insert Users method does not require you to enter a first or last name for Users, the message is sent with the first and last name as blank if you use the default message text. The default message text is only a suggestion, and can be edited as needed to suit your individual situation. If you are creating Users via Add/Insert Users, it is suggested that you remove the First and Last Name dynamic content tags from the "New Account Created" Communication Message text. If your new User accounts are created via a bulk import or a User integration that populates the First and Last Name fields during the account creation, the First and Last Name dynamic content tags will successfully populate in the "New Account Created" message received by the User. |

Copyright © 2010-2015, Oracle and/or its affiliates. All rights reserved.
 Related Topics